Table of Contents
What Are Hip Dips?
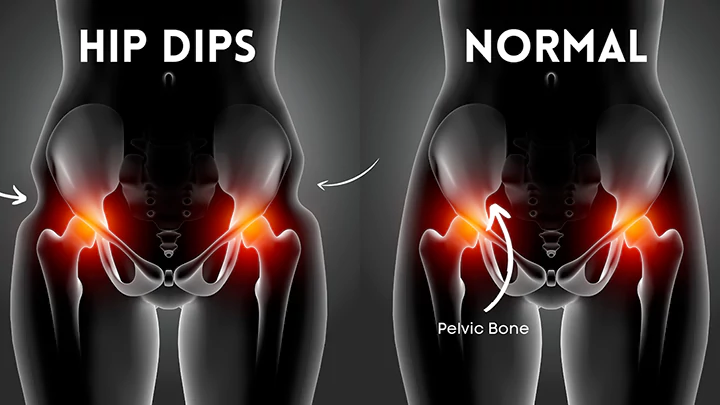
Hip dips are a natural indentation or depression on the outside of your upper legs, just below your hip bone.
They can be caused by fat distribution, muscle tone, and genetics. Although hip dips are generally considered to be a cosmetic concern, they can also be a sign of hip joint problems.
Most people have hip dips, but they may become more noticeable if you gain weight or lose muscle tone. Hip dips can also be exacerbated by wearing tight clothing or skirts that show off this area of your body.
There are several ways to reduce the appearance of hip dips, including exercises that strengthen your hip muscles and diet changes that help you lose weight in your hips and thighs.
What Causes Hip Dips?
Hip dips are a natural occurrence and can be more or less prominent depending on the width of your hips and the shape of your pelvis as well as the distribution of your body fat. Hip dips can be more apparent according to your cloth choice.
There is no one definitive answer to this question, but there are several factors that can contribute to hip dips.
Some of these include:
- The shape of your bones
- The distribution of your body fat
- The muscle mass in your hip area
- How tightly the skin is attached to the deeper part of your thigh bone
These factors can vary from person to person, which is why hip dips can look different on everyone.
Most of the times hip dips are normal and very rarely it causes by any existing medical condition.
In short, Hip dips are a natural occurrence that mostly results from the shape of your skeleton, such as the width of your hip bones. Additionally, where muscle and fat are distributed near your hips and buttocks can also cause hip dips.
Read Vitamin C For Skin Whitening
Read Celebrities with Hip Dips
Are Hip Dips Bad?
I have hip dips. You have hip dips. Your mom has hip dips. Her mom had hip dips too.
But is hip dipping actually a bad thing? What do hip dips even mean? Today, we’re going to find out if hip dips are good or bad for you, and why they happen in the first place.
There are three things that could potentially affect your hip shape:
- Genetics
- Hormonal changes
- Some chronic illnesses
Any one of these factors can change how your bones develop over time, leading to different shapes in the hip area — including hip dipping!
Unless any chronic illness causes it, hip dips are not bad.
Are Hip Dips Normal Or Not?
As mentioned, hip dips are a normal, natural occurrence and nothing to be concerned about. Their presence doesn’t necessarily reflect your body fat percentage – many people with hip dips have a relatively low body fat percentage.
Fortunately, there has been a growing trend toward body acceptance, with many social media influencers and celebrities embracing their hip dips for what they are – a normal, beautiful part of the human body.
If you’re struggling to come to terms with your hip dips, remember that you’re not alone! Thousands of people have them, and they’re nothing to be ashamed of.
So don’t worry – hip dips are perfectly normal! There’s no need to fix something that’s not broken. Embrace your hip dips.
In short, There is nothing wrong with having hip dips and they do not indicate your health status. People who have them sometimes feel self-conscious about their hips but someone else’s opinion shouldn’t matter.
Having hip dips does not mean you will develop osteoarthritis later on in life or that you could break a hip. If you do have hip dips it won’t cause any hindrance to your daily activities.
Read Buccal Fat Removal
Hip Dips Vs. Love Handles
The hip dips vs love handle battle have raged on for ages.
Hip dips are commonly referred to as the area of skin that folds over on the hip bones on either side of the groin. Many workout routines attempt to build hip dip-free hips.
Love handles, also known dubbed ‘muffin tops’, are the fat roll that appears above your pants. If you’re not familiar with this site, please refer here. Love handles are more common in males than they are in females, but both have them!
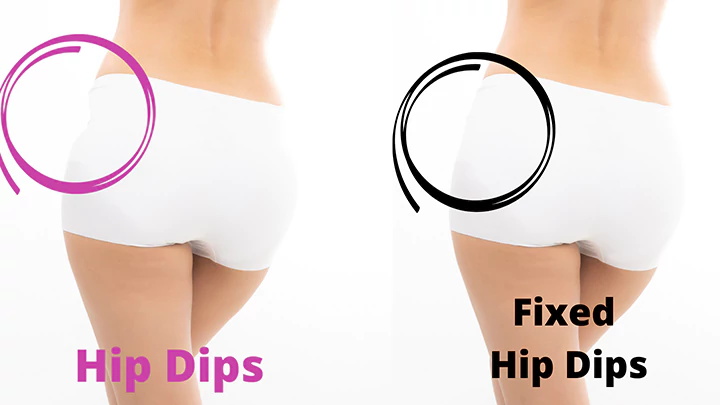
Can You Get Rid of Hip Dips?
It’s not possible to get rid of hip dips completely, but you can minimize their appearance by building muscle mass and losing body fat.
It’s a common problem, but you don’t get it. When you look in the mirror and your lower body doesn’t measure up to your standards, there is one muscle group that might get the blame: the glutes.
Yes, we’re looking at you and your hip dips. It’s an unbecoming trait that runs rampant among women even though it’s often brought on by genetics — and not much can be done about it. Or so we thought.
High-intensity workouts that focus on strength training can help firm up any part of the body — including trouble spots like the hips — so building stronger muscles naturally improves shape, tone and reduces the size of hip dips.
Make sure you focus on strengthening your entire lower body, though – not just zeroing in on your glutes.
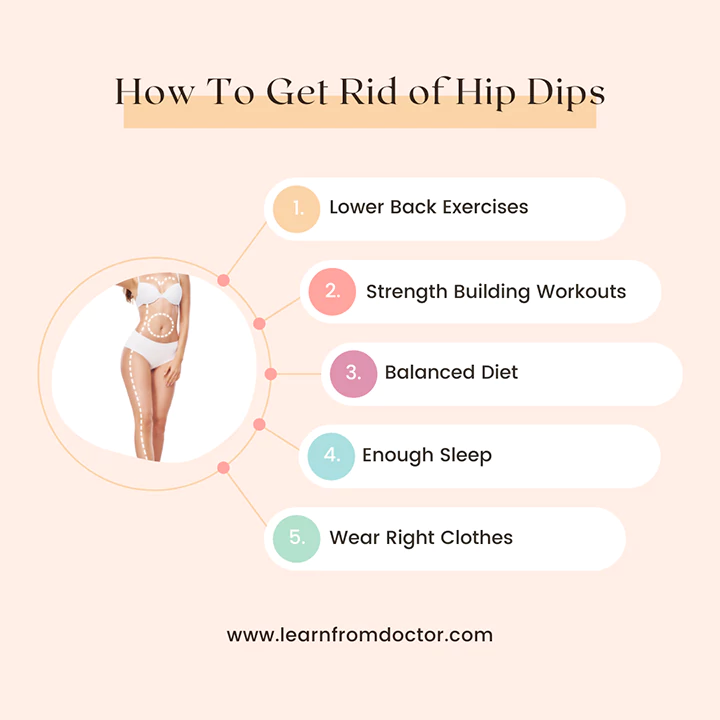
How to Get Rid of Hip Dips
If you’re searching for how to get rid of hip dips in a natural and healthy way, you’re certainly not alone. Many women and men experience this issue and find it quite vexing.
Fortunately, there are solutions available that can help you get rid of your hip dips without having to resort to surgery or using harmful products such as steroids or supplements.
Instead of looking for a quick remedy, focus on exercise and diet. Some exercises that focus on the muscle related to the hip dips, can help you to reduce the appearance of hip dips.
Strengthening these muscles would make you fit, athletic and reduce your hip dips.
The muscles you need to focus on include;
- hip extensors such as gluteus maximus, hamstrings, and adductor Magnus
- hip flexors such as iliacus, psoas major, and rectus femoris
- hip adductors such as adductor brevis, adductor longus, adductor magnus, gracilis, and pectineus
- hip abductors such as gluteus medius, gluteus minimus, and tensor fasciae latae
- lateral rotators such as quadratus femoris, piriformis, obturator internus, and externus, superior, and inferior gemellus
Before the boring stuff, get yourself checked out by a medical professional just to be sure that there are no underlying issues. Most people with hip dips have no pain but if you do get hip pain get it looked at now just in case.
One of the most important things you can do is focus on strengthening and stabilizing your hips. There are a number of exercises that can help with this, including bridges, clamshells, and squats.
Another thing to keep in mind is your posture. Make sure you are standing up straight and keeping your core engaged. This will help to improve your stability and reduce the appearance of hip dips.
Read Cankle – How to get rid of | Body Sculpting | Breast Augmentation
Top 15 Exercise To Get Rid of Hip Dips
You may do such exercises to help reduce the appearance of hip dips. They will assist you in gaining muscle and losing weight.
Make sure you’re doing the poses right by looking in the mirror. Start with your weaker or less flexible leg in the exercises that require one side at a time. As a result, you’ll start with the more difficult side and the second side will appear to be simpler.
Start with 1 to 2 sets per day and work your way up. On different days, you may want to do different workouts. Attempt to perform these activities for at least 20 minutes a day, four to six days a week.
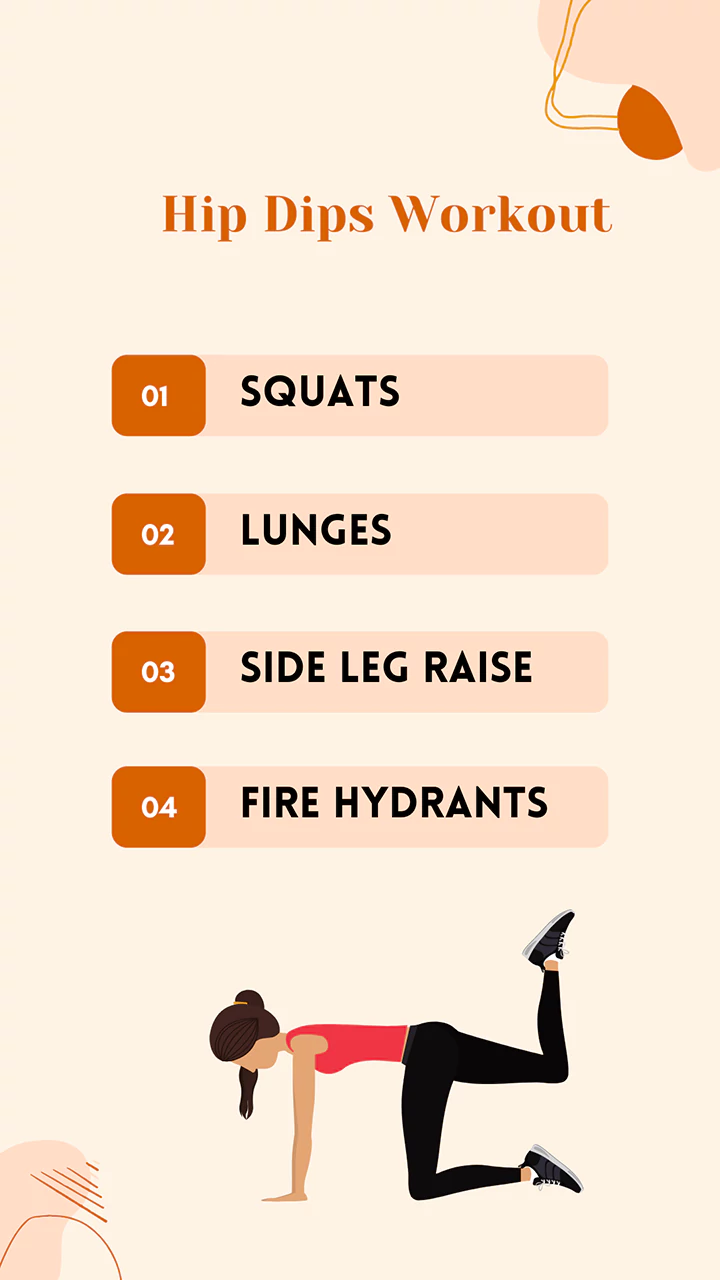
These exercises will help you to reduce the hip dips and look beautiful as you want. As well as these exercises will strengthen the muscles of the following;
- Hips
- Thigh
- Abdomen
- Buttocks
Read – Breast Lift Surgery | Enlarged Clitoris | Celebrities with Lipedema
Squats
The squat is a compound movement, which means it engages multiple muscle groups and involves multiple joints. The quadriceps (the muscles in the front of your thighs) and glutes are the main muscles involved in the dance (your butt muscles).
The muscles in your hamstrings and hip flexors fire as well during the eccentric portion of the move, or the lowering portion of the squat. Squats also strengthen and avoid injury by working the muscles around the knee.
Other Benefits
Your core muscles fire in the step to keep you stable.
Your abs double as stabilizers. As a result, they help with weight-bearing movements. Strong core muscles are beneficial because they not only aid in lifting but also reduce the risk of lower back pain.
You work your upper body while you do a weighted squat, whether with a dumbbell in a goblet squat, two dumbbells in a front squat, or a barbell in either a back or front squat. This is because the transition necessitates isometric weight keeping or a rigid muscle contraction with no movement.
Weighted squats, like other types of load-bearing physical activity, are good for your bones: they help you develop stronger bones, which will help you avoid osteopenia or osteoporosis as you get older, according to him.
Plus, since a proper squat necessitates hip and ankle mobility, you can think of squatting as a mobility exercise that can help you move easier.
Read Phentermine vs Adderall for weight loss
Steps of Squats
Assume a squat position.
Before you squat, make sure you’re in the right position: Maintain a shoulder-width distance between your knees. There is no set rule on how your feet should be positioned; it can vary based on anatomical variations, but a good rule of thumb is that they should be turned out between 5 and 30 degrees.
As a result, instead of pointing straight ahead, your feet will turn out slightly, the amount of which will depend on your level of comfort and mobility.
Your feet should be firmly planted on the ground.
Dialing your feet into the ground engages your muscles, improves alignment, and provides ground support. It will also prevent your arches from falling, which can cause your knees to cave inward while squatting.
Keep your chest high and straight
Squats need the upper body as well. Keep your chest proud and uplifted. This will prevent you from rounding your shoulders and upper back, which can overstretch your spine, particularly if you’re squatting with weight on your back.
Start the movement.
When you’re ready to squat, think about bending your knees and pushing your hips back to begin the movement. For the descent, brace your heart and keep it braced throughout the movement.
Make sure the quirky aspect of the movement is under your influence. Take a few seconds to lower yourself rather than running through it.
This will boost the amount of time your muscles are under stress, forcing them to work harder. (If you’re working out at home and don’t have access to the weights you’re used to, slowing down the eccentric is a perfect way to make the transition feel more difficult.)
Inhale as you lower, and your knees can track laterally above your first or second toe as you squat. If you track too far in, your knees will break inward, and if you track too far away, your knees will be overworked. Don’t be too concerned about the old adage that your knees can never stretch further forward than your toes.
Anatomical variations in bone length will cause your knees to stretch further than your toes. Attempting to limit the movement can cause you to lean forward, even more, putting more strain on your lower back.
When you get to parallel, take a pause and breath.
When do you call it a day and stop moving? There’s a lot of debate about how deep you can squat, but most people should aim for parallel depth for their squats. That means your thighs’ backs will be parallel to the ground.
Some people struggle to get to parallel due to a lack of mobility or an injury—in which case, it’s best to finish the squat at whatever depth is pain-free for you—but others resort to quarter-squats because they’re carrying too much weight.
If that’s the case, lowering the weight and executing the step across its full range of motion is the best option.
Stop for a second after you’ve reached the bottom of the squat so you don’t use momentum to lift yourself back up. You can also make the transfer more challenging by increasing the duration of your pause.
Drive through your shoes as you stand.
According to Tamir, make sure your feet remain planted in the squat, paying special attention to driving through your heels on the way back up. This will activate your posterior chain, or back muscles, such as your hamstrings and glutes.
When driving through your feet, some people have a tendency to pick up their toes, but you should make sure your whole foot remains firmly on the ground – your big toe is actually very critical in glute activation.
On your way back up, you can also exhale. It’s important to remember to breathe during the move—inhale on the way down, exhale on the way up. You don’t want to be holding your breath at all.
Hip Abduction
The movement of the leg away from the body’s midline is known as hip abduction. Every day, we use this movement to step to the left, get out of bed, and exit the car.
The hip abductors are vital but often overlooked muscles that help us stand, walk, and rotate our legs comfortably.
Hip abduction exercises can not only help you get a tight and toned backside, but they can also help you avoid and manage hip and knee pain. Men and women of all ages, particularly athletes, may benefit from hip abduction exercises.
Benefits
Knee valgus is a condition in which the knees cave inward, giving the impression of being knock-kneed. This is most common in young women and older adults, as well as those who have muscle imbalances or poor exercise type.
The hip abductors are intertwined with the core muscles and are essential for balance and athletic performance. Many people grow weak gluteus muscles as a result of sitting for long periods of time during the day.
Long periods of inactivity will cause the body to “turn off” these muscles, making them difficult to use during exercise. This may cause your body to use muscles that aren’t designed for certain tasks.
Pain, poor results, and trouble with some movements can all result from using the wrong muscles. Using a resistance band around the knees will help increase gluteus medius activation during squats, which can improve overall performance.
Overuse injuries, patellofemoral pain syndrome (PFPS), and iliotibial (IT) band syndrome can all be caused by weakness in the hip abductors, especially the gluteus medius. When you sit for long periods of time or go downstairs, PFPS can cause pain behind the kneecap.
People with PFPS are more likely to have hip weakness than those who do not have knee pain, according to the report. This backs up the notion that hip abductor strength is crucial for knee health and stability.
Treatment for PFPS usually involves anti-inflammatory medications, rest, and stretching of the muscles around the hip and knee, in addition to exercises that strengthen the quadriceps, hip abductors, and hip rotators.
Steps of Hip Abduction
Abductions of the hips can be performed almost anywhere. They’re simple to integrate into your travel workout routine because they don’t need bulky equipment.
- On an exercise mat, lie down on your side with your legs spread and your hips in a parallel line, one on top of the other.
- Bend your lower arm beneath your shoulders, allowing your head to rest completely on your forearm, in line with your vertebrae.
- Your feet should be perpendicular to your legs and in a neutral position.
- Exhale as you raise your upper leg above your hip joint. Stop and hold the position for one to two seconds when your hips and back begin to tense.
- Inhale and lower your leg slowly to its starting point, holding it straight and stacked directly above your lower leg.
- Repeat the process for a total of ten rises.
- Switch to the other side and repeat the procedure for the other leg.
- Alternate legs for a total of three sets of ten raises on each leg.
Common Mistakes of Hip Abduction
- Raising Too High
- Going Too Fast
- Leaning Forward or Backward
- Straining the Neck
Fire Hydrants – Side Hip openers
A fitness move called a fire hydrant has an odd name. However, the quadruped (or all-fours) exercise is extremely effective at simultaneously hitting many main areas of the body, including your glutes, hips, and heart. This helps you to save time while simultaneously strengthening and sculpting various muscle groups.
It’s crucial to concentrate on this region of your body because you need your core and hip complex to work together to pass force between your upper and lower body. It serves as the basis for your entire kinetic chain, which includes your muscles, joints, and nerves.
Benefits
The crawl, your most fundamental gait, is modeled by being in a quadruped position. You toggle your core stabilizers and reinforce your foundation while you’re on all fours. Aside from your abs, this step focuses on your glutes, specifically the medium, Maximus, and tensor fascia latae, so you can sculpt your ass from any angle.
Plus, the lateral lift of your leg away from your body (a.k.a. abduction) helps you to travel in three dimensions, which is something that most people don’t do. This leads to increased hip mobility and flexibility, allowing you to execute more complex movements like bird dog down the road in this position.
It’s important to use the proper type and methodology when using fire hydrants. You can learn how to do them by watching this video. You don’t need any special equipment since the fire hydrant is a bodyweight exercise. What you’ll need is a mat.
- Start by getting down on your hands and knees. Your shoulders should be higher than your hands, and your hips should be higher than your knees. Look down and tighten your heart.
- Lift your left leg at a 45-degree angle away from your torso. Maintain a 90-degree bend in your knee.
- To complete one rep, return your leg to the starting spot.
- Perform three sets of ten reps. Rep with the opposite leg.
Glute Bridges
The Maximus, medius, and minimus are the 3 gluteal muscles. They help with hip stability and movement, as well as making you look great.
Sitting at a desk all day is a surefire way to develop poor glutes and lower back issues. The natural tendency is to sit too far forward, which causes your hip flexors to tighten and your glutes to essentially shut down.
Including them in your workouts is beneficial not just to your physique but also to your systemic wellbeing.
Benefits
If you’re doing it right, you can experience a burn in your glutes and hamstrings. The bridge is also beneficial for enhancing hip mobility and lower back strength, two things that any desk-bound worker can use.
Steps of Glute Bridges
- Lie down face up on the floor, knees bent and feet flat on the floor. Maintain a side-to-side position with your arms at your sides, palms facing down.
- Lift your legs off the ground until they form a straight line with your elbows, hips, and shoulders. To avoid overextending your back during the workout, squeeze your glutes hard and keep your abs pulled in.
- Before easing back down, hold your bridged spot for a couple of seconds.
- If all you care about are your hip dips, aim for two sets of ten bridges twice a week, either as part of a larger bodyweight workout or on their own.
Clams
The gluteus medius is the primary muscle targeted by the clamshell exercise. The abductor is the muscle that runs around the outside of your buttocks and the side of your hip.
The value of your medial glutes cannot be overstated, as they are responsible for hip stability, balance, and strength, among other things.
Strong medial glutes stabilize, propel, and shield the knees and lower back from excessive pressure by taking on most of the workload involved in lower body movement. This includes any side-to-side movements you might do during an agility workout.
The gluteus maximus, a key player in hip extension, is also targeted. The squat and deadlift target the largest muscle in the body, and it’s this one that most people want to form and improve. This is the muscle you’re talking about when you say you’re tightening up your ass.
Benefits
It’s important to stimulate the muscles that will be doing the work first while doing movements like the squat or deadlift, where one of the primary goals is to develop glute strength. This message is for you if you do a squat and just feel your quads burning.
To trigger your glutes, do a few sets of clamshells before your squats or deadlifts. This helps to keep them focused and productive as prime movers.
The clamshell, as a general workout, will help strengthen your medial glutes, giving your hips more power and flexibility. This can also lead to a lower risk of injury in the entire lower body, increased stability in agility exercises, and increased squat strength and power.
Steps of Clams
- Stack your feet and hips on your right foot, bend your knees 90 degrees and lean your head on your right arm.
- Bring your knees in close to your body until your feet are parallel to your buttocks. To keep your left hip from tilting backward, place your left hand on it. This is where you’ll begin.
- Boost your left knee as high as you can without moving your hip or raising your right knee off the floor, keeping your abs engaged and your feet together.
- Hold for 1 second at the top of the move, squeezing your glutes, before slowly lowering your left knee to the starting spot.
- Continue for a total of 20 reps, then switch sides and repeat.
Side Curtsy Lunges
This pose strengthens the thighs and buttocks on the side. Throughout the game, try to remain as low to the ground as possible. Keep the front foot’s toes facing forward. Make sure you’re taking a genuine turn to the left. These lunges can also be done when carrying a dumbbell.
Steps of Side Lunges
- Begin by standing with your feet shoulder-width apart.
- Raise your right leg and position it in front of your left leg.
- In a curtsy lunge, lower your right leg.
- Bring your right foot forward and in front of your rear.
- Rep the process on the other hand.
- On either foot, do 15 lunges.
Side Leg Raise(Standing)
A standing leg raise is a very flexible exercise because it can be done almost anywhere, even when waiting.
You may use a chair or some type of support to help you stay more stable.
Steps of Standing Side Leg Raise
- Begin with your hands outstretched in front of you or on the hips. Keep your toes facing up, stand straight.
- Inhale and transfer your weight into your left foot while you raise your right leg off the floor with the foot flexed.
- Put the left leg back down to touch the right as you exhale.
- Rep 10-12 times on one line, then turn to the other.
Standing Side to Side Squats
Side squats are a leg, glute, and outer thigh strengthening exercise that results in sturdy, sculpted legs and a healthy, toned lower body. Squats on the side are the unloved cousin to all squats.
Side squats, which are often ignored in favor of the more common simple squat or other variations, teach you how to apply lateral movement and power to your outer and inner thighs.
Squats are an excellent leg exercise that goes without saying. Squats are recommended by any trainer and fitness professional for leg strength as well as calorie burn since working the larger muscle groups burns more calories.
The basic squat should be your first target, but once you’ve mastered it, it’s crucial to spice up your workouts and add variety to the moves. Squats come in a variety of forms, each with its own spin on the power it offers. Side squats do a variety of things that aren’t seen in most exercises. For starters, they incorporate lateral movement into the workout.
You must step not only forward and backward but also side to side. Second, shifting side to side forces more muscles in your legs, especially the outer and inner thighs, to turn on and unlock.
Steps of Standing Side Squats
Begin by standing with your feet hip-distance apart and bending your knees into a squat position.
Maintain tight abs and a straight back. Step wide to one side while remaining in a squat position, return to your starting position, and then side squat wide in the opposite direction while using all of your lower body muscles before returning to the middle. Squat side to side, remaining low the whole time.
Leg Kickbacks
Leg kickbacks are similar to everyday movements. A kickback is performed by standing on one foot and stretching one leg behind you. Once you kick your leg in front of you, your hip is in extension, which is the opposite of flexion. One of the key movements of your glutes especially the gluteus maximus is an extension.
Kickback exercises are an amazing training technique for getting rid of hip dips or getting the glute muscles firing properly for running, cross-country skiing, or any other activity that needs a proper hip extension.
Steps of Leg Kickbacks
- On an exercise pad, get down on all fours. Your wrists should be under your elbows, and your knees should be under your hips.
- Maintain a straight spine by contracting the core muscles.
- Extend your right leg back and up until your hip is parallel to the deck, without adjusting the angle of your knee. Shape Fit recommends kicking like a horse. Your right foot’s sole should be facing the ceiling.
- At the end of the cycle, contract your glute muscle and hold for one count.
- Rep from the beginning, this time without touching your knee to the ground.
- Switch sides after 12 to 20 repetitions.
Using a resistance band of the required intensity to add resistance. Wrap one foot in the center of the band and put the handles under your palms. Extend the banded leg behind you, but hold the knee at a 45-degree angle to prevent the band from slipping.
Side Lunges
The lunge, as well as the reverse lunge, are excellent lower-body movements, but they have one major drawback: they only need you to step forward and backward. That’s a challenge because life doesn’t always hit you square in the face, so you have to step sideways from time to time.
The side lunge, or lateral lunge, will increase sports efficiency as well as recruit a couple of extra muscles on your inner and outer thighs that the forwards-and-backward lunges can’t reach.
The quads and glutes are the main muscles exercised by the side lunge, as they are by the normal and reverse lunges, but the extra emphasis on the inner and outer thighs makes it an exercise you can have in your arsenal even if you don’t plan on playing sports because it will improve your lower body’s functional strength.
Steps of Side Lunges
Begin by standing erect and shoulder-width apart with your feet parallel. Your back should be straight, and your weight should be distributed evenly around your heels. Take a large step to the side and, holding your body as upright as possible, lower until your leading leg’s knee is bent at about 90 degrees, while your trailing leg remains straight. Return to the starting point by pushing yourself back up.
The most popular side lunge type flaw is collapsing over the straight leg. As with a squat, focus on bending and lowering from the shoulders, keeping the back straight and core engaged. When you lower, make sure both of your feet’ heels are on the ground.
You can swap legs or do multiple side lunges on one leg before switching sides. Strive for a total of 20 side lunges on each leg, or incorporate them into a timed circuit routine.
Skater Lunges
Primarily, this lunge variant is a jumping curtsy lunge. As a result, it strengthens the gluteus medius while also assisting in the development of lower body strength.
Stand erect with your feet hip-width apart and a set of dumbbells by your sides at arm’s length (palms in). This is where you’ll begin.
Hop to your right, landing gently on your right foot after moving off with your left foot and sweeping your arms around your body.
Lower your torso until your right leg is parallel to the floor, bringing your left foot behind and to the outside of your right foot.
After a brief pause, repeat the action to the left, moving off with your right foot and landing gently with your left.
Each rep should be done on the opposite side of the body.
Bicycle Crunches
Do you want to tone up your abs and reduce your hip dips? If so, bicycle crunches are great for you!
This workout targets hip dips as well as hip flexors. You can add ankle weights or dangle a towel from your feet you want more resistance during the exercise.
Steps of Bicycle Crunches
- Lie on the floor, bend your knees as the feet touching the floor hip-width apart. Your hand should be behind your head and the elbow facing outward.
- Use your abs muscles, lift your knee at a 90-degree angle. Raise your upper body a little.
- Move your right elbow toward your left knee, go back to the starting position.
- Do the same to the other side.
- Do the exercise nonstop for about as long as you can.
Completing both sides completes a rep. You should exhale while touching elbow to knee and inhale while returning to the starting position.
Heel touchers
The heel touchers is a good example of an ab exercise that works the entire side of your midsection. It helps to tighten and tone the muscles along the waist, hips, and obliques.
This heel toucher exercise may be done from a standing position or on your knees depending on how difficult you want the movement to be.
If you start lying down (prone) with your arms outstretched over your head, lift yourself up onto your forearms first before moving into the heel touch part of this sit-up.
You will get more resistance if you are doing it from a prone position because gravity adds force to its pull on the body.
Flexibility, as well as strength in both legs, should determine whether you do heel touch or toe touch.
Plank Hip Dips
If you want to improve your core stability, strength, and power, but hate planks, hip dips are a great plank variation.
To perform hip dips keep your body in a straight line from head to toe. If you bend at the waist or hips you won’t be as effective. While hip dips seem simple, they can really work your abs hard if done correctly and safely.
- Position yourself on all fours with your hands directly below your shoulders and knees beneath your hips. Keep your neck and spine neutral. This is the starting position for hip dips:
- Inhale as you slowly slide one hip towards the ground while keeping the rest of the body stable and still maintaining balance. for a second before exhaling
You may already assume that this exercise is named hip dips. It should work well to reduce hip dips.
Dumbell Side Bend
Although we talked about all weightless exercises, this exercise can be done with a dumbbell and it works well to get rid of hip dips.
The perfect waist is the number one desire of every woman. Many women try to lose fat around their waist and achieve a slimmer waistline by doing crunches, side bends, or twists that target their waistline.
But have you ever wondered what part of your waist these exercises actually work? The truth is that all three do not affect fat from the waistline; these exercises tend to burn calories but they are not effective when it comes to losing belly fat.
The reason why most waist training techniques fail in achieving a slender waistline is that they don’t burn the belly fat that covers up our perfect waist. The dumbbell side bend targets and burns away stubborn stomach fats, giving you the flat-toned abs you dream about.
Steps of Dumbbell Side Bend
- Start by standing up straight with your feet should be shoulder-width apart.
- Hold a dumbbell in each hand and keep your palms facing outward for the entire exercise.
- Bend to one side, then hold it there while you squeeze your obliques (side abs). You’ll feel the muscles along the sides of your waist contract.
- Take a very small step forward with that foot (if you’re bending to your left, take a tiny step forward with your right foot).
- Then return to an upright position and repeat on the other side. Be sure not to lean over too far forward on the negative half of the rep or let momentum get away from you on the positive half of the rep—keep your core tight!
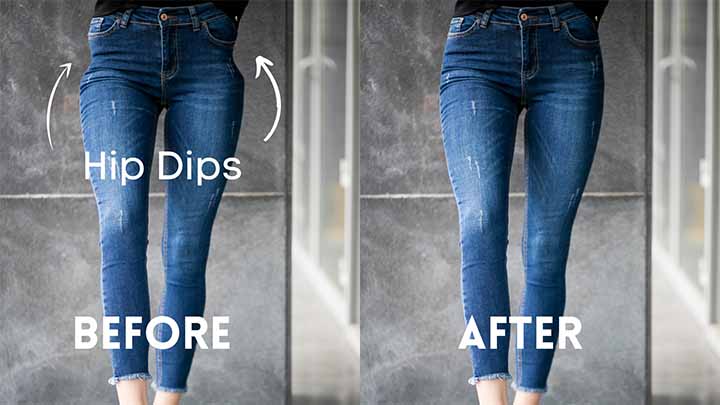
Before and After Hip Dips
I’ve seen before and after pictures of individuals before, during, and after the fitness transformation journey. But I’ve never seen before and after pictures of before and after hip dips! For those wondering what hip dips are, they’re a small gap in between your thighs that you may or may not have. Some individuals have them while others don’t.
You can see an example on the before photo on the left (on her left thigh). Hip dips appear to be more common in women than men because of body composition differences throughout their lives such as having higher levels of estrogen which helps with storing fat on the hips.
Healthy Lifestyle is the Key to Reducing Hip Dips
Make every effort to take the requisite steps toward establishing a balanced lifestyle. You can feel better if you exercise, eat well, and just take care of yourself.
Make sure you’re getting enough calories and drink plenty of water. Carbohydrates can provide you with additional energy to help you get the most out of your workouts. It’s possible that eating lean protein will help you gain muscle mass. Healthy fats, calcium, and fiber should all be included in your diet. Sugar, tobacco, and processed junk food can all be avoided. Make healthy food choices, but note that it’s okay to splurge once in a while.
Working out other parts of the body will help to balance out your workout routine. It’s important to do a number of exercises to transform the body. Certain forms of cardio exercises should be incorporated into the routine. Maintain a consistent fitness schedule and incorporate physical exercise into your everyday routine. For more details, talk to your doctor.
Frequently Asked Questions (FAQs)
Why do I have hip dips?
Hip dips are caused by the structure of the pelvic bone. You are not responsible for your bone structure, also you cannot change your bone structure.
How to get rid of hip dips in a week?
You cannot get rid of hip dips within a week. If you have excessive fat in that area, then you may undergo bariatric surgery. But still, you have to keep patience and maintain a good lifestyle with proper diet and exercise.
How to fill in hip dips?
Exercise is the key to success here. Follow the routine mentioned earlier and eat a balanced diet. Soon you’ll notice results.
How to get rid of hip dips without exercise?
You cannot get rid of hip dips without doing any exercise. According to your body structure, you may need more or fewer exercise sessions. But you must do some exercise. A surgical procedure won’t help you much in this case.
What do hip dips look like?
These are inward curves just under your hips and above your thigh. They look like an inward wave.
What clothes should I wear with hip dips?
Hips dips are natural and nothing to be ashamed of. You should not hide them. Still, if you want to hide them, don’t wear tight pants or a dress. Try to wear something large and not that tight which makes your hip dips visible.
Last Updated on April 13, 2022 by Learn From Doctor Team


